Create Category in Magento 1.9
31 January 2017
By limenotlemon
Create Category Magento top navigation maximal depth
One of the best features you can get from Magento is its ability to set up multiple stores. That is right, you can host several different stores from one Magento installation. Those stores will pull its products from the Root Category. That is why, before you build your stores, you need to set up your categories first.
If you want to have multiple stores but with the same products, then you can set up the same root category for all your stores. However, if you want to set up different products, then you need to create different root category for each store. Once your root category is set up, you can add subcategories to further customize your product.
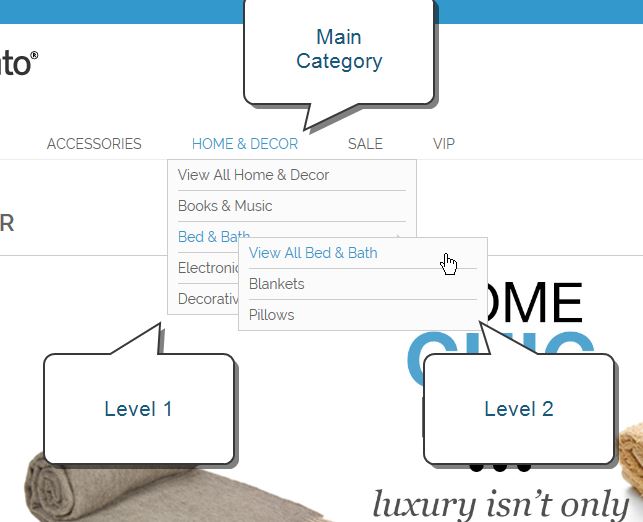
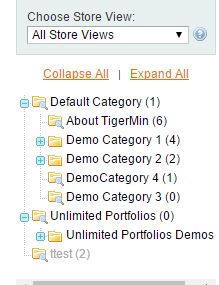
Basically, there is no limit to the number of subcategory levels you can set up for your online store. For example, you can create a category “Home & Decor”. Its subcategories are “books & music”, “Bed & Bath”, “Electronic”, and “Decorative”. Each of those categories has their own subcategories, like “bed & bath” which has “Blanket” and “Pillows”. That is mean, “Home & Decor” category has a depth of two levels.
Set The Depth of The Top Navigation :
To set the depth of your top navigation, go to admin menu, select System -> Configuration. You can see some tabs on the left side. Under catalog, choose Catalog. Click Category Top Navigation.

Fill in the numbers of subcategories limit which can be used in the top navigation inside Maximal Depth field. 0 is the default value. Click “Save Config” button.
Create New Root Category :
Root categories are the highest level of product organization in your online store. Magento system uses root categories to connect your store with a set of products.
Structure for Magento categories is like an upside-down tree, with the root on the top part instead of bottom part. All existed categories in your catalog will be located below the root. Due to the fact that root category is the highest level part of your catalog, your online store only can have one root category active at a time. However, you can create additional root category for alternate catalog structures, views, and different stores. Root category will not be visible to your customers.
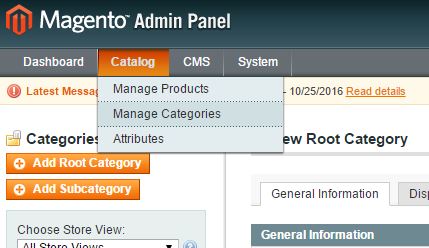
To create new root category, click Catalog ->Manage Categories in the admin panel.
Click Add Root Category button at the left side of the screen. There are some fields you can fill in.
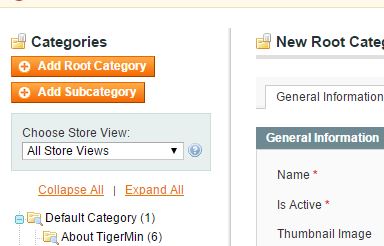
Name
Enter a proper name for your new root category. This name will be a background resource and will not appear in the front end store. It will be associated with your assigned store. Most beginner Magento users will stick with “Default Category” instead. The default setting is the best option if you only want to use a single root category and want to customize it more with subcategories instead.
Is Active
Set to “yes” to activated the new root category.
Thumbnail Image
Upload an image for the thumbnail. If your theme supports it, you can associate your thumbnail image with each category and it will appear as a part of option in your store’s main menu.
URL Key
This is the relative path to the category and it will be automated generated when you click the save button. URL key should be in all lower-case characters without any spaces inside. If you edit the default URL, a custom one will be created automatically. A root category will not have any URL key because it will not appear in the store’s navigation menu.
Description
You can put your description here. If you do not leave this empty, then the description will appear below the category image and before the product list.
Image
Upload picture for the image. If you put an image here, it will appear at the top of the category page, before the product list and description. You also can display a CMS static blog instead of image and description.
Page Title
If you fill it in, the title will appear in the title tab and browser bar. A good title should not be longer than 12 words and it should include a combination of primary and secondary words.
Meta Keywords
This part only useful for search engine system. You can use keyword tools to find high-value keywords which related with your category. It should not be more than 30 words and avoid to use repeat words.
Meta Description
Fill in the meta description for your category. It should not be more than 25 words.
Include in Navigation Menu
Set “Yes” if you want this root category to be in the main menu.
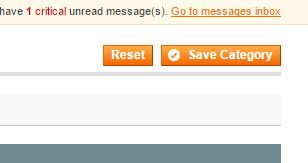
When you finished fill in all the fields, click “Save Category” button.
Actually, to set up a new root category and run your store, you only need to focus on the General Information tab and the Name, Is Active, and Include in Navigation Menu tabs. You probably will come back to this page once more when a new product created and a new assignment needed.
Keep in mind that you need to set your root category in active mode if you want to assign it.
Create Subcategory :
In Magento, a subcategory is the most basic level of product organization. This is where you will sort your products before you use more specific details like attributes. For example, if you create an online store for books, then you may create a subcategory for kids books, novels, study books, etc. You can customize your products more with attributes like colors, sizes, materials, etc. Everything will be up to you as a store manager.
Unlike root category, your subcategories will appear in the front-end store. They will help your customers to be able to find what they are looking for. Subcategories are the best single way to separate different types of products besides the attributes.
Creating subcategories is almost the same as creating root categories.
First, click “Add Subcategory” button at the left side of your screen.
Just like the root category, the fields you can fill in are the same. You only need to concentrate on Name, Is Active and Include in Navigation Menu tabs. You can leave the others empty if you want. It would be the best if you can create Root Category and Subcategory first, and add your products later. This way, you will have something to assign those products.
After you created a new category, you can edit it, move it to another position in your category tree. If you want, you even can delete it too. However, if you already run your site in live mode, change or delete a category may give an unwanted impact for your existing product. For example, if your product’s URLs are included in the category path when you change or delete it, the path will be deleted too and will make the URL broke.
If you want to avoid that problem, you can set your category to automatically create a permanent redirect when the URLs change. You also can use URL rewrite.
If you want to move a category, first go to the admin panel, click Catalog -> Manage Categories. All you need to do is just simply drag and drop the category you want to move to the new location. Category order changes will save automatically.
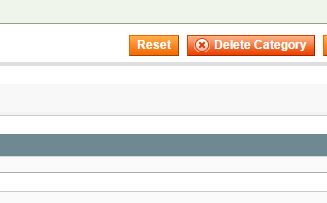
To delete a category from your category trees, go to Catalog -> Manage Categories. Select the category you want to delete, and click the “Delete Category” button. Keep in mind that you can not restore a deleted category, so make sure you choose a right one before you process further.
There are also ways to hide categories. There may be an occasion where you want to create additional category levels just for your own internal benefit, but at the same time, you only want to show higher level categories to your customers. Or you probably want to link to a category which is not included in the navigation menu.
In order to create hidden category in your system, first, go to the admin panel. Click Catalog -> Manage Categories. Select Category you want to hide in the category tree.
In the general information tab, set the Is Active to no, and do the same for Include in Navigation Menu drop-down.
In the display setting tab, set “Yes” to Is Anchor. The category you hide will still active and you can link them from other places in your store, but it will not appear in the navigation menu anymore.
When you finished set up your hiding category, click “Save Category” button.
Beside the General Information tab, there is a tab which called Display Setting. This is where you can determine which content elements will appear on the category page and the order that products are listed.
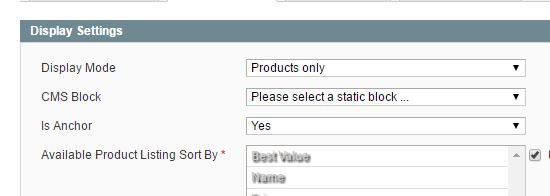
Display Mode
To determine the content elements displayed on the category page.
CMS Block
To display CMS static block at the top of the category page. Choose the name from the available list.
Is Anchor
Set it to Yes if you want to include the “filter by attribute” section in the layered navigation.
Available Product Listing Sort By
The default values which used for this option are Value, Name and Price. If you want to customize it, clear the Use All Available Attributes check box and select the other attributes you want to use.
Default Product Listing Sort By
This option is to define the default “sort by” option.
Layered Navigation Price Step
If you leave it empty, Magento system will use the default price range in increments of 10, 100, and 1000, depending on the product in the list.
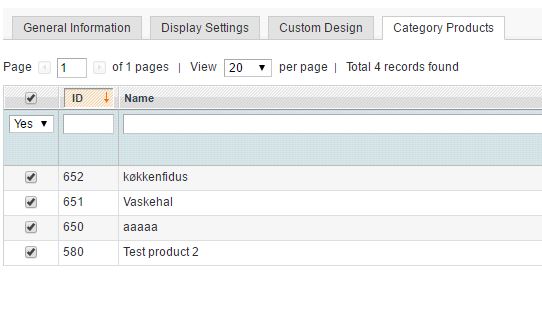
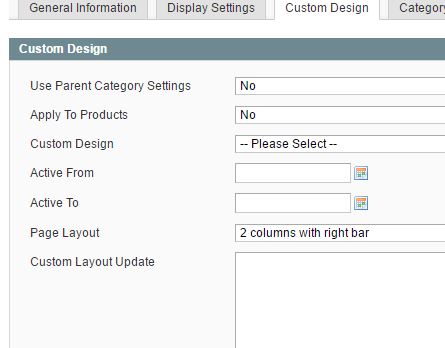
The other two tabs are Custom Design and Category Product. Custom Design is the place to change the look and feel of categories and all assigned product pages. You can use it to increase your sales or to customize the page for a promotion event.
In the Category Product tab, you can see all the products that are currently assigned to the categories. You can either add or remove products from the list.